Registration and Login
Login Page
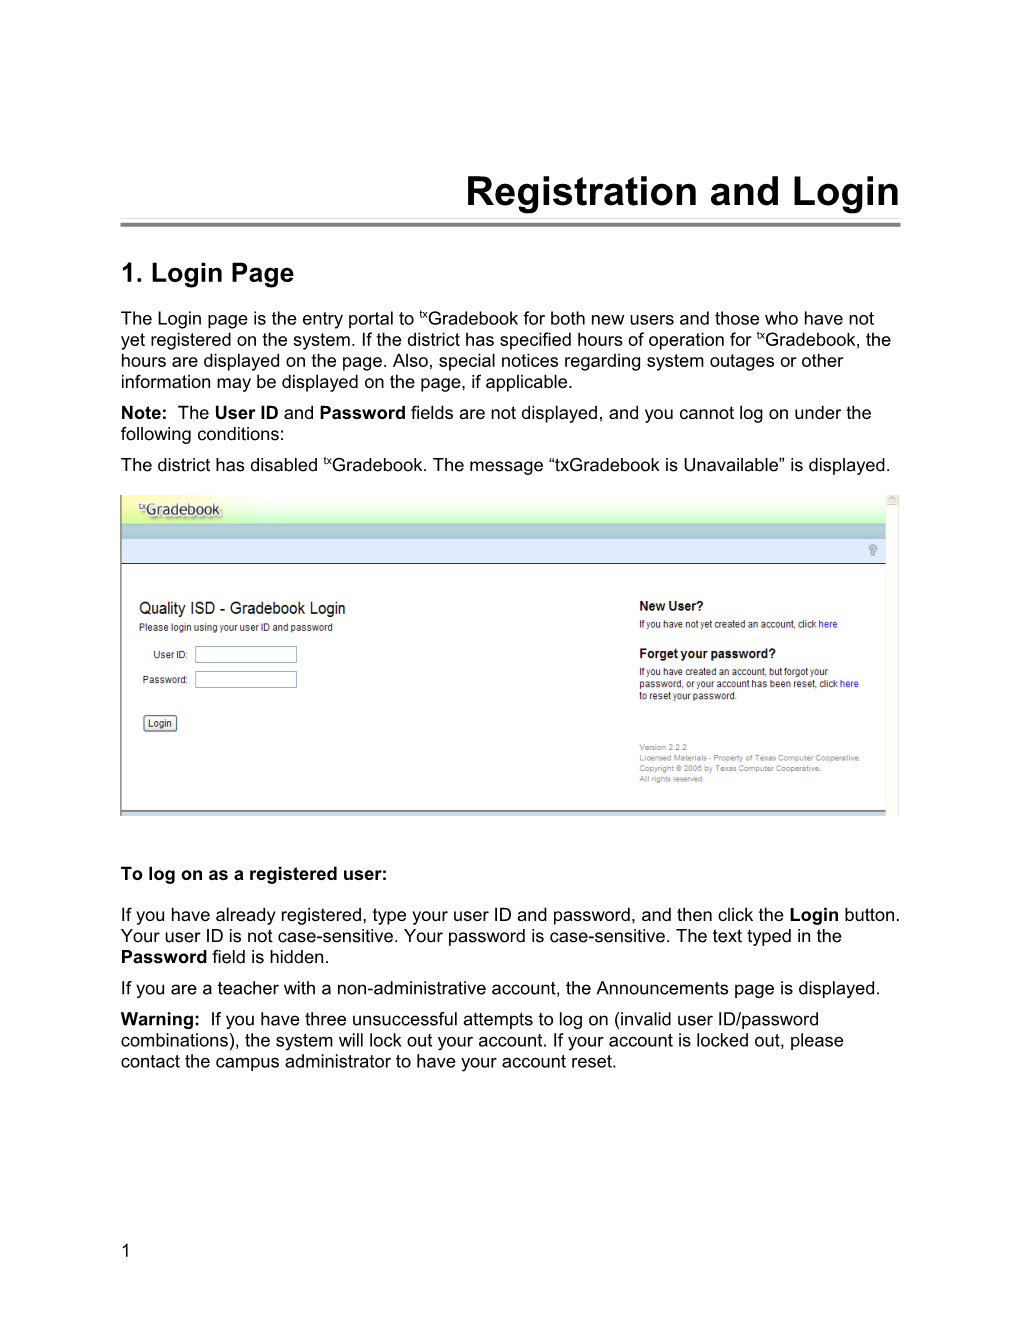
The Login page is the entry portal to txGradebook for both new users and those who have not yet registered on the system. If the district has specified hours of operation for txGradebook, the hours are displayed on the page. Also, special notices regarding system outages or other information may be displayed on the page, if applicable.
Note: The User ID and Password fields are not displayed, and you cannot log on under the following conditions:
■ The district has disabled txGradebook. The message “txGradebook is Unavailable” is displayed.
To log on as a registered user:
If you have already registered, type your user ID and password, and then click the Login button. Your user ID is not case-sensitive. Your password is case-sensitive. The text typed in the Password field is hidden.
If you are a teacher with a non-administrative account, the Announcements page is displayed.
Warning: If you have three unsuccessful attempts to log on (invalid user ID/password combinations), the system will lock out your account. If your account is locked out, please contact the campus administrator to have your account reset.
Registration Pages
To register a new user:
If you are a new user who has not previously registered for txGradebook, click the link on the Login page under New User to begin the registration process.
The Registration Step 1 page is displayed.
The Registration Step 1 page is the beginning of the process to authenticate a new user.
- Type a valid staff ID (your social security number), last name, and first initial. Please make sure your campus secretary has put your social security number in the system.
- Type the required data, and then click Next. The Registration Step 2 page is displayed.
- The Registration Step 2 page requires that you type a user ID, password, and personal identification number (PIN).
● Your user ID must be six to eight alphanumeric characters and unique within the district. The user ID is not case-sensitive. Check with your district administrator to find out if special formatting is required.
Note: Once established, a user ID cannot be changed or deleted.
● Your password must be six to nine alphanumeric characters. Use at least three of the following: uppercase, lowercase, numeric, and/or punctuation (e.g., aBc1234). Your password is case-sensitive.
● Your PIN must be four numeric characters. It is recommended that you do not choose 1234 or 4321, as these are common and easily guessed.
- In the E-Mail Address field, type your e-mail address (e.g., ).
- Enter the required data, and then click Next. The Registration Step 3 page is displayed.
The Registration Step 3 page requires that you select and answer a set of three hint questions. The questions will be asked in the event that you lose your registration information.
Note: You will be required to answer the questions correctly in order to recover your registration information. Be sure to select questions for which you will easily remember your answer. Answers are case-sensitive.
- Enter the required data, and then click Next. The Success page is displayed.
- Click Finish. You are redirected to the appropriate page according to your access level. If you are a teacher with a non-administrative account, the Announcements page is displayed.
To exit the registration process:
At any point during the registration process, you can click Back to Login to cancel your registration and return to the Login page. Any data you entered up to that point is not saved.
Update Profile Pages
The Update Profile pages allow you to change your password, PIN, or hint questions at any time. For administrative users, the Update Admin Profile pages are used instead.
Settings > Update Profile
To update a user profile:
- In the Current Password field, type your current password. You must type your current password correctly in order to update any data in your profile.
- To change your password, type a new password in the New Password field. Your password must be six to nine alphanumeric characters. Use at least three of the following: uppercase, lowercase, numeric, and/or punctuation (e.g., aBc1234).
- Type your password again in the Confirm Password field. It must match the password you typed in the New Password field exactly.
- To change your PIN, type a new four-digit PIN in the New PIN field.
- If you want to provide your telephone number to parents in txConnect, type the number in the Phone Number field in the NNN-NNNNNNN format. If you leave the field blank, your phone number will not be provided in txConnect.
- If you want to provide your e-mail address to parents in txConnect, type the address in the Email Address field (e.g., ). If you leave the field blank, your e-mail address will not be provided in txConnect.
- If you want to provide additional notes to parents, such as conference period availability, type the notes in the Notes field. If entered, the comments will be displayed for parents in txConnect.
- Select Combine Courses in Attendance if you want to combine classes for attendance reporting. The field is selected by default. If you do not want to combine courses for attendance reporting (e.g., prekindergarten courses that meet morning and afternoon), clear the field.
- If you want to update your hint questions, select Update Hint Questions. The questions are updated on the next page when you click Next.
- In the Student Order field, indicate where you want new students to be listed on the following pages and reports: Assignment Grades, Cycle Grades, IPR Comments, Print IPR, Assignment Grades Report, and Class Roster Report. This field works in conjunction with the Arrange Student Order page and is only available to users who are logged on as teachers. The field is not available to administrative users.
● Alpha (default) order - All students are listed in alphabetical order, regardless of the custom sort order established on the Arrange Student Order page.
● Add new students to the top of the list - Any new students who have enrolled in the course section since you last saved a custom sort order are displayed at the top of the list.
● Add new students to the bottom of the list - Any new students who have enrolled in the course section since you last saved a custom sort order are displayed at the bottom of the list.
The setting is the same for all of your classes.
Notes:
● If you select the option to list new students at the top or bottom of the list, but you have not set up a custom sort order for all course sections, only classes that have a custom sort order are affected. For all other course sections, all students are listed in alphabetical order.
● This field allows you to toggle between displaying students in alphabetical order and your custom sort order. If you have created a custom sort order, you can temporarily change this field so your students are displayed in alphabetical order. When you change the field again to add new students to the top or bottom of the list, your custom sort order is retained.
- Select Use Independent Scroll Bars on Assignment Grades if you want independent scroll bars for the assignment grades table on the Assignment Grades page. If you clear the field, the complete assignment grades table will be displayed. If the data requires more than one screen, the page scroll bars must be used to view the additional data.
Note: The field is ignored if you are using an Apple mobile device. The independent scroll bars are not available on Apple mobile devices.
- In the Default Assignment Due Date field, indicate if you want a default date to be displayed in the Date Due field on the Administer Assignments page. You can select no default date, the current date, or up to five days in the future. For example, if you selected Current Date +2, and the current date is May 20, the Date Due field on the Administer Assignments page will display May 22 by default. If May 22 occurs on the weekend, the Date Due field will display the date of the following Monday.
- Click Next. If you selected Update Hint Questions, the Update Profile Step 3 page allows you to update your answers to the hint questions.
- You can change your hint questions and answers, and then click Next.
- If you entered all required data, the Success page is displayed. Click Finish to return to the Announcements page.
Other Account Maintenance
To recover a locked account:
If you have three consecutive unsuccessful attempts at signing in, your account will be locked, and you must contact your campus txGradebook administrator to have your password reset. Once your account is reset, you can use the Reset Password (recover a lost password) procedure described later in this guide to reset your password.
To change a password to continue:
For security purposes, your password will expire periodically. The amount of time that your password is valid is set by the district. If your password has expired, you are redirected to the Password Expired page before the Announcements page is displayed.
- Type your current password.
- Type (and retype to confirm) your new password.
- Click Submit.
If you typed the data correctly, your password is changed, and the Announcements page is displayed.
To reset a password or recover a lost password:
The Reset Password page allows you to reset your password in the event that you forget your password and need to regain access to txGradebook. You can also change your password at any time.
To access the page:
From the Login page, click the link under Forget your password. The Reset Password Step 1 page is displayed.
- Type your staff ID and user ID, and then click Next. The Reset Password Step 2 page is displayed.
- One of your hint questions is displayed. In the Answer field, type the answer to the question exactly as you typed it during the registration process.
- Click Next. If you typed the data correctly, the Reset Password Step 3 page is displayed.
- In the Password field, type a new password. The password must be six to nine alphanumeric characters. Use a combination of the following: uppercase, lowercase, numeric, and/or punctuation (e.g., aBc1234). Your password is case-sensitive.
Note: You cannot reuse your last password.
- Retype your password in the Confirm Password field.
- If you want to change your PIN, type a new PIN in the New PIN field, and then retype the PIN in the Confirm PIN field. Click Finish. Once your password is changed, the Announcements page is displayed.
1